Run Algorand Indexer using Azure Portal
This tutorial is the Azure Portal version of Run Algorand Indexer on Azure with Azure Cli
The Algorand blockchain, like other popular blockchains, generates a huge amount of data. A new block is created every 4 to 5 seconds with a number of transactions ranging from a few dozen to over a hundred transactions in each block. Reporting on those data is crucial for any business application connected to the blockchain and this requires a powerful search engine, capable for example of retrieving the so called “whale transactions”, or to track the balance of a specific account.
The Algorand Indexer provides powerful search capabilities for Algorand blockchain. You can query the indexer for transactions, assets, blocks, accounts, providing various criteria. The Indexer requires a PostgreSQL database to store the ledger data and a connexion to an Algorand archive node to read the data. There is already a complete guide on how to install an Indexer on the Algorand developer portal, but this tutorial will focus on doing it on Microsoft Azure Portal, the user interface provided by Microsoft to manage resources on Azure.
 cURL
cURL
Requirements
This tutorial requires an understanding of general computer science concepts like virtual machine, network, database. You also need an Azure subscription.
The tutorial may be run with a free Azure account but note however that the database storage will require capacity beyond the free tier. As of the time of writing this tutorial (2022/07/12), the MainNet Indexer database size was ~1.37TB and ~800GB for TestNet. So with a free account, you will have to adjust the size of your database an will not be able to fully sync you indexer with a real network because of low space.
The Indexer also requires a full archive node to sync. In case you also want to create such a node, note that as of 2022/07/12, a full archive node on MainNet requires ~850GB and ~326GB on TestNet. You can check Algoscan analytics web page for an updated estimate.
Steps
1. Create an Azure Resource Group
An Azure resource group is a management feature that allows you to group related resources and apply global setting on them. All the resources that we will create for this tutorial will belong to the same resource group. This is very useful as deleting the resource group at the end of the tutorial will delete all resources created in the group.
Search the resource groups service in the search bar of the portal as displayed in figure 1-1.
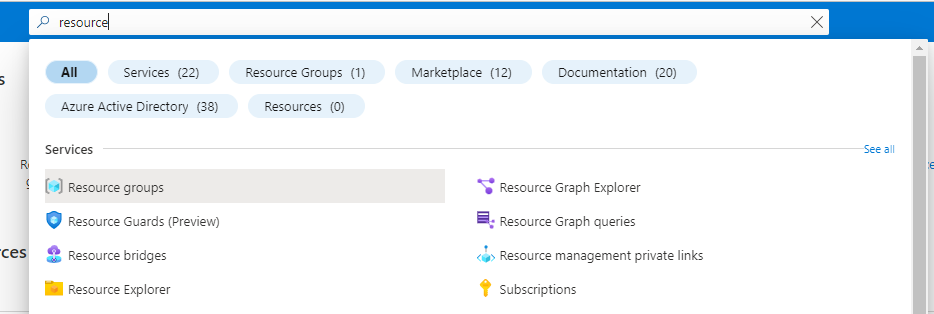
Figure 1-1 Search for the resource groups service
Click on “Resouce groups” and the click on “Create” to create a new resource group.
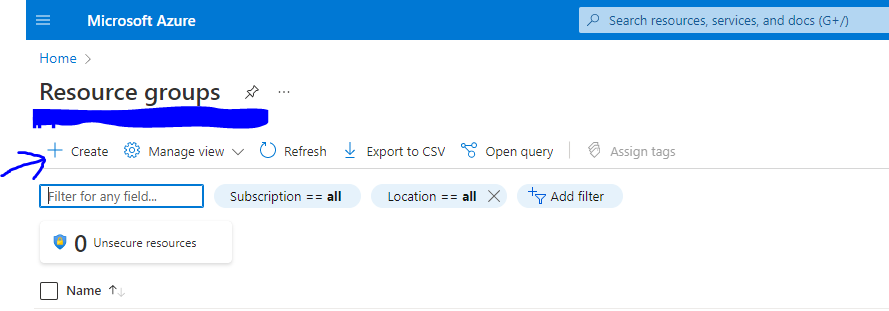
Figure 1-2 Create a new resource groups
You now land on the form where you can enter the details of your resource group
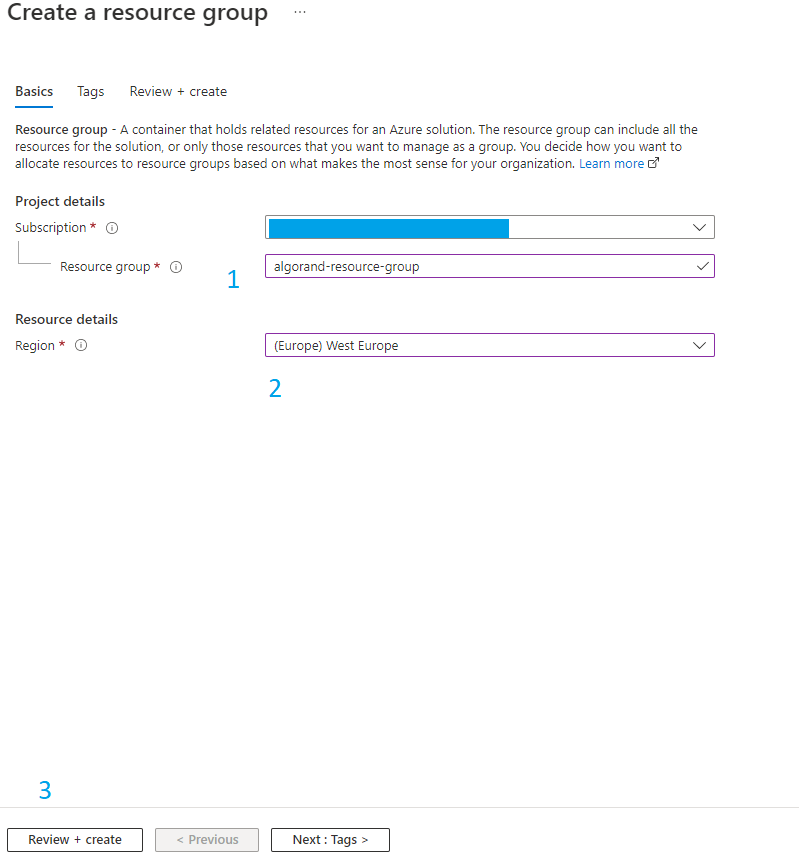
Figure 1-3 Resource group form
- 1 Enter the name of your resource group
- 2 Select the region. Before creating any resource in azure, the first choice you have to make is the location of your resources. Azure provides regions and availability zones that define where your resources will physically be located. Not all resources and services are available in all regions. Except for a very short testing purpose, you should not select a random location for your resources.
- 3 Click on the “Review + create” button
You now have a last chance to review your resource group and click on “Create” as shown in Figure 1-4.
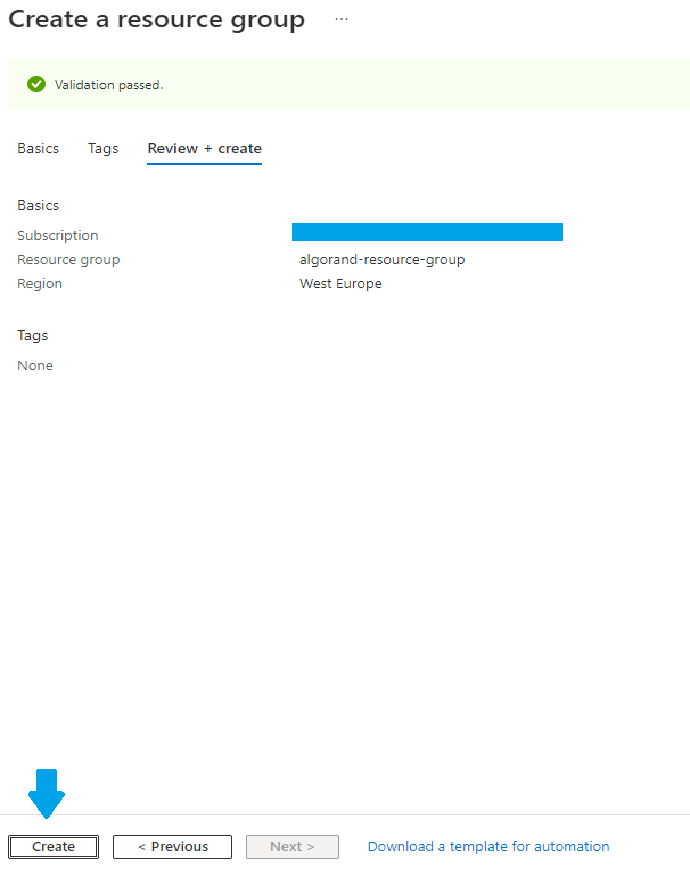
Figure 1-4 Review resource group before creating
Upon successful creation, you new resource group will appear in the list of resource groups (Figure 1-5)
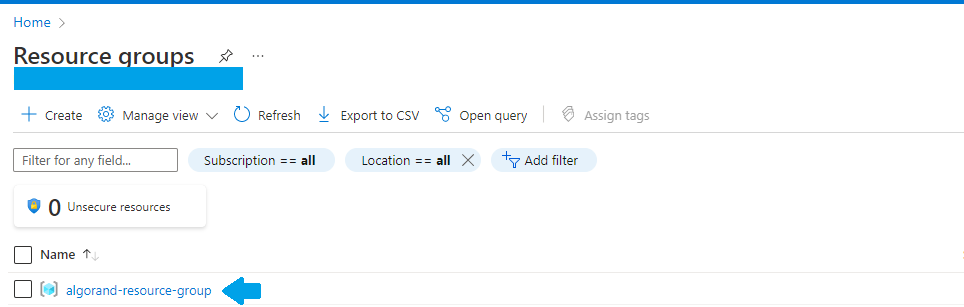
Figure 1-5 List of resource groups
2. Create the Indexer Database
As of the time of writing this tutorial, the last version of Algorand Indexer is 2.12.3 and was tested with Postgres 13. There are two different services provided by Azure to deploy a managed PostgreSQL server: Azure single server and Azure flexible server.
One of the main differences between both is that the later targets mission-critical workload. Azure single server would be enough for our tutorial, but only Azure flexible server supports PostgreSQL 13 as of the time of writing this tutorial. Please, check Azure Database for PostgreSQL versioning policy for the list of supported PostgreSQL version
Use again the search bar and type “flexible” to find the Azure Database for flexible server service as shown in Figure 2-1
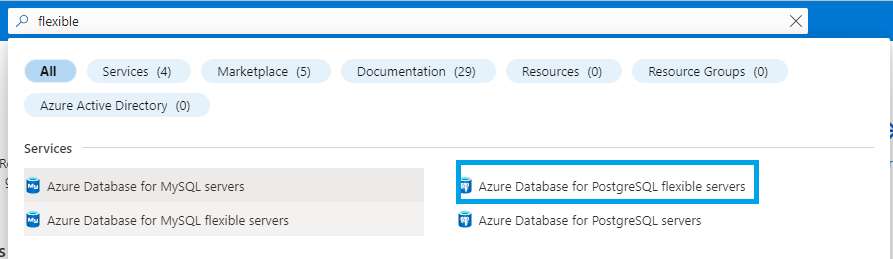
Figure 2-1 Search flexible server service
Like for the previous resource, click create in the new page (Figure 2-2).

Figure 2-2 Initiate PostgreSQL flexible server creation
You need to fill a lot of information to create the flexible server. We will review them one by one, starting with Figure 2-3

Figure 2-3 Create Flexible server - Form part 1
- 1 Enter the resource group we created in Step 1
- 2 Enter the name of your flexible server
- 3 Select the region. Pick the same one you used on step 1
- 4 Select version 13 of PostgreSQL
- 5 For our tutorial, we select development for Workload type. Select the appropriate option for production.
- 6 The “compute + storage” option determines the computation power of your database server. Click “Configure server” to update the value.
To better understand the computation power and see the available options, see Concept Compute Storage. You have an estimate cost on the right of Figure 2-4 each time you adjust your settings.
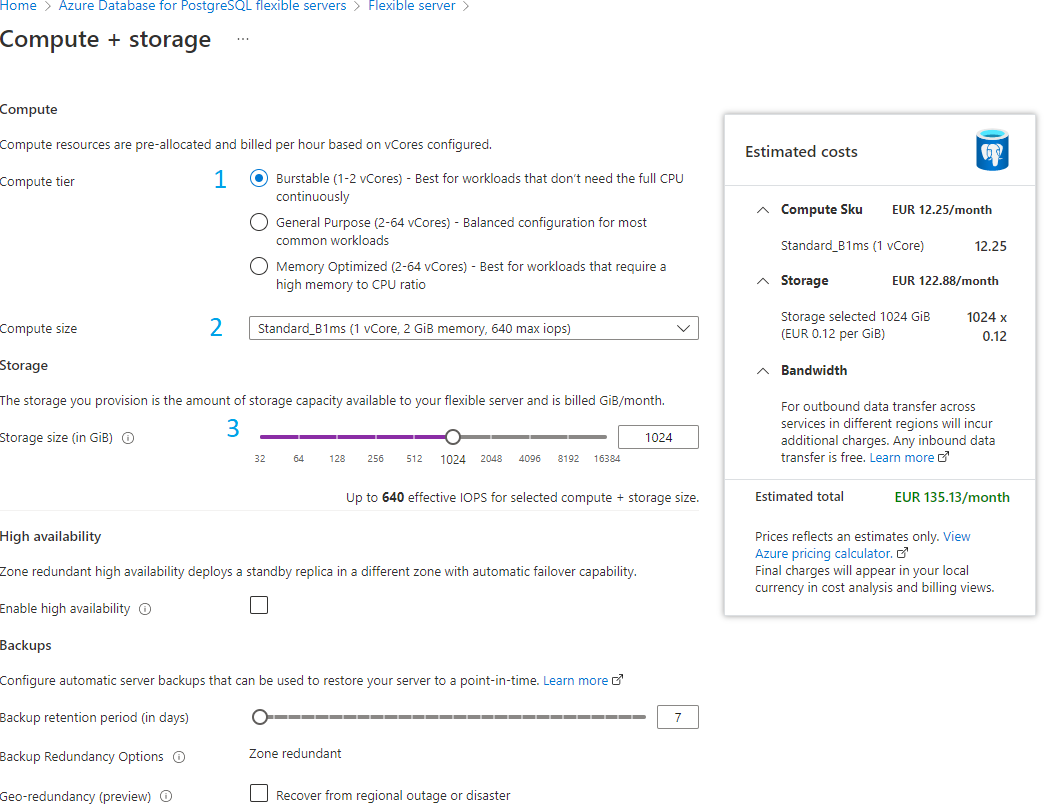
Figure 2-4 Flexible server compute+storage options
- 1 Select Burstable as it’s enough for the tutorial. General purpose my be used for a standard installation
- 2 Select the compute Size
- Select the storage. When using a free tier account, since the storage size is limited, you will probably need to reduce this value. Unfortunately, the indexer may therefore not have enough space to complete its initialization…
With the compute+storage completed, set the account for the database as shown in figure 2-5
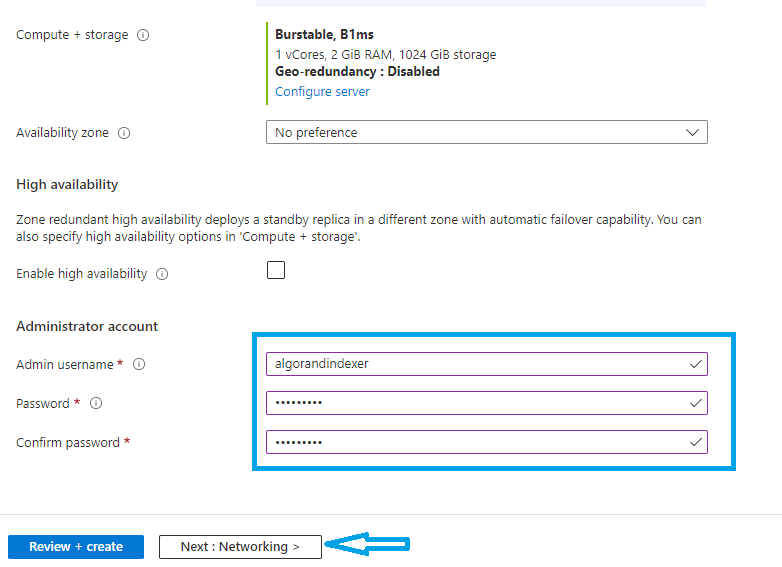
Figure 2-5 Set database account
Next, click on “Next: Networking”. When you create a flexible server, a Vnet (virtual network) and a subnet are required. The subnet will be dedicated to the creation of resources for the flexible server. Will will not be able to create other resources in that subnet. See Figure 2-6 to configure the network options.
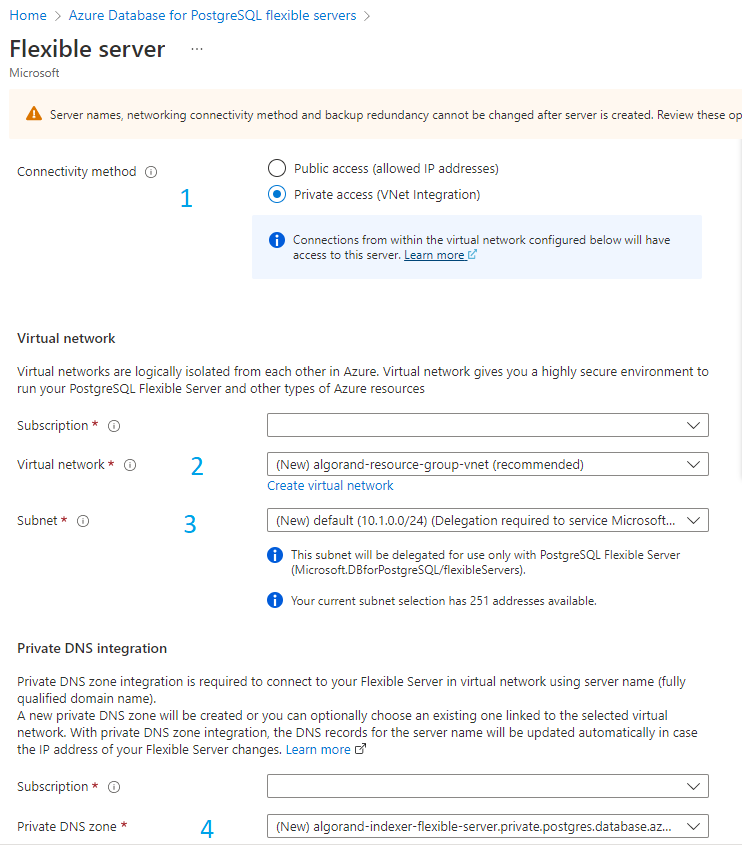
Figure 2-6 Configure Virtual Network
- 1 Select “Private access (VNet Integration)”. We only need the indexer to access the database, so no need to expose it on Internet with a public access. Access will be possible from resources located in the same virtual network.
- 2 Keep the default proposal to create a new virtual network.
- 3 Keep the default proposal for Subnet.
- 4 Keep the default proposal for Private DNS zone.
You can now review all the details of your flexible server. The Virtual network created here will be used later to deploy the virtual machine on which the indexer binaries will run. Review the details and click “Create” (Figure 2-7)
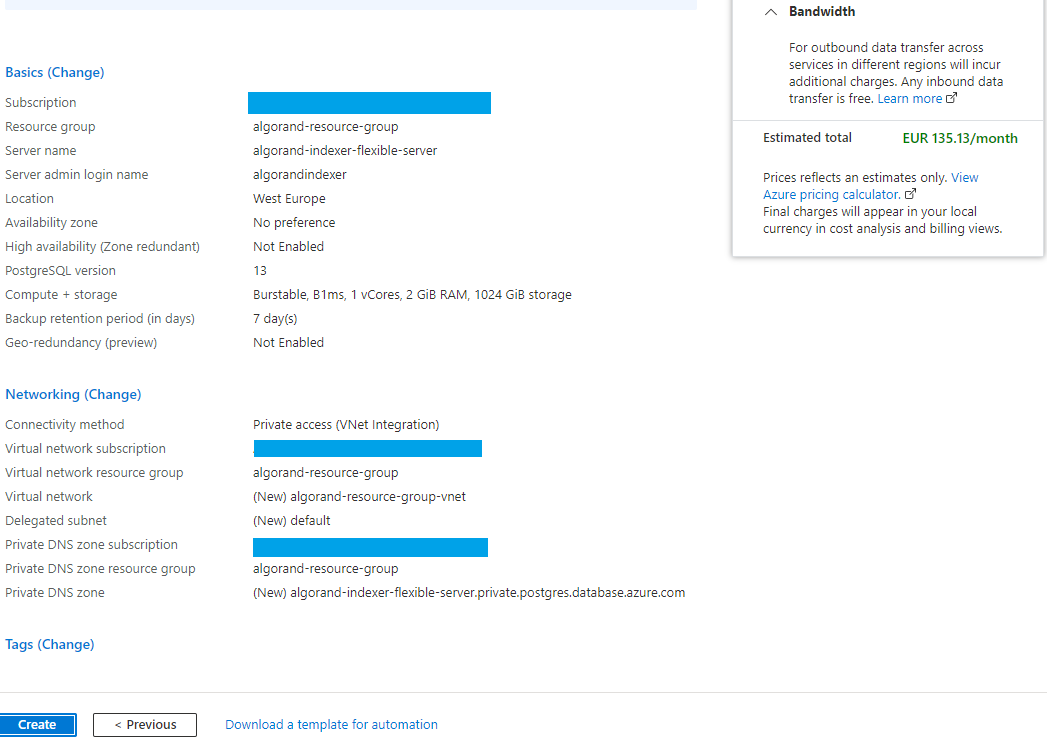
Figure 2-7 Review and create flexible server
3. Create the Server to run Algorand Indexer binaries
Azure VM is used to create virtual machines. We will use one to install and run the Algorand indexer binaries. Again, use the search bar to find the virtual machine service (Figure 3-1) and click “Create” to create a new vm.
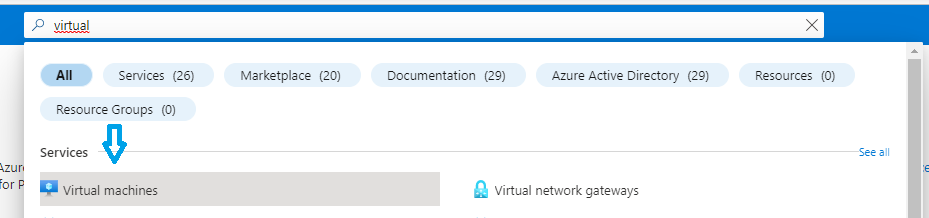
Figure 3-1 Search Virtual machines service

Figure 3-2 Initiate VM creation
Many options are required as shown in figure 3-3. Let review them one by one.
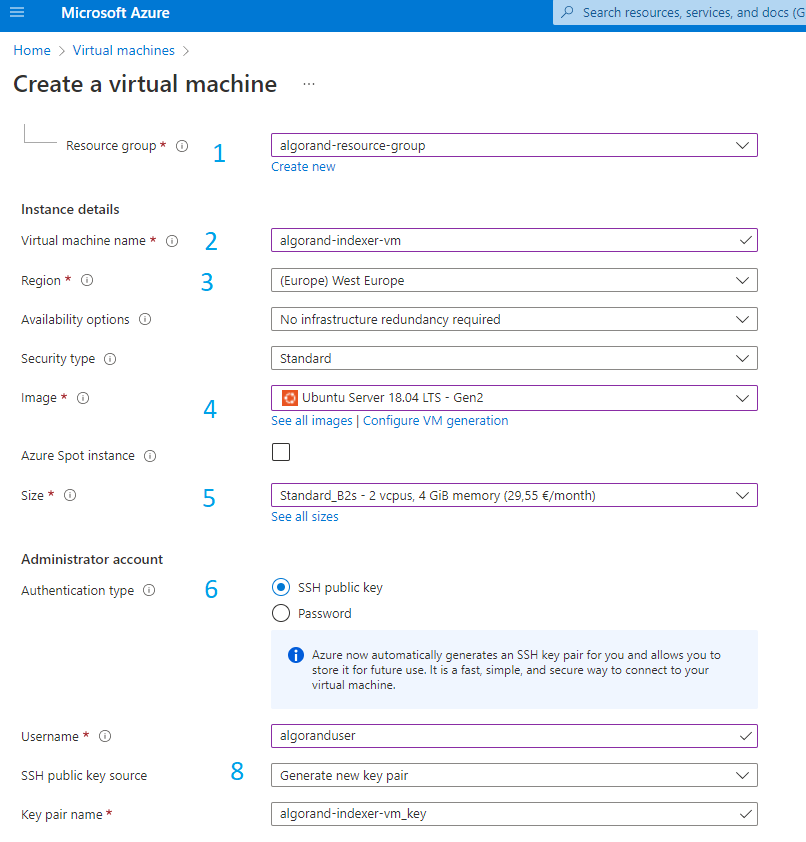
Figure 3-3 Create virtual machine main form
- 1 Select the resource group we created on step 1
- 2 Enter a virtual machine name
- 3 Select the same region we selected for resource group and flexible server
- 4 Select the Image that will be installed on your vm. I never got any problem with Algorand components when using Ubuntu.
- 5 The size option is about the computation power of your server. Please, check this page for a description of available configurations.
- 6 When you create a virtual machine, you need to setup how you will log into your server. A best practice is to use SSH keys and avoid a simple user/password authentication. Azure also allows you to create and manage SSH keys.
- 8 Enter a username that will be the default user of your vm (with sudo privileges), use generate new key pair and enter the name of the key. Azure will create a private/public keypair for you and you will need to dowload the private pey and store it on your computer. Note that Azure will only keep the public key in your account. It’s your responsibility to keep the private key safe and Azure prompt you to download he private key only once.
Next, configure the inbound rules. These rules determine the network traffic that you allow on the vm. The default rule (Figure 3-4) allows ssh connection on port 22 (using the private key) from anywhere. The warning only means that any user with access to the private key can connect to your server using ssh. You may restrict this later to only allow ssh connection from a restricted set of IP addresses.
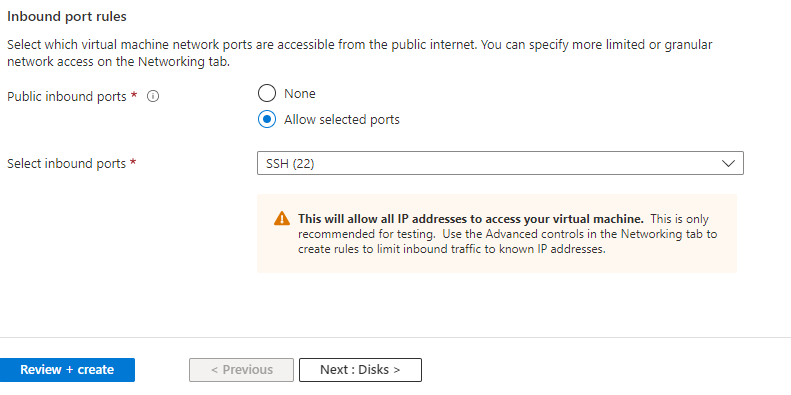
Figure 3-4 Inbound port rules
Click “Next: Disks”, keep the default options of the new page that appears and click “Next: Networking” (figure 3-5).

Figure 3-5 Disk Options
Now we will use the virtual network that we created on step 2 of this tutorial to create a new subnet for the VM as shown in figure 3-6.
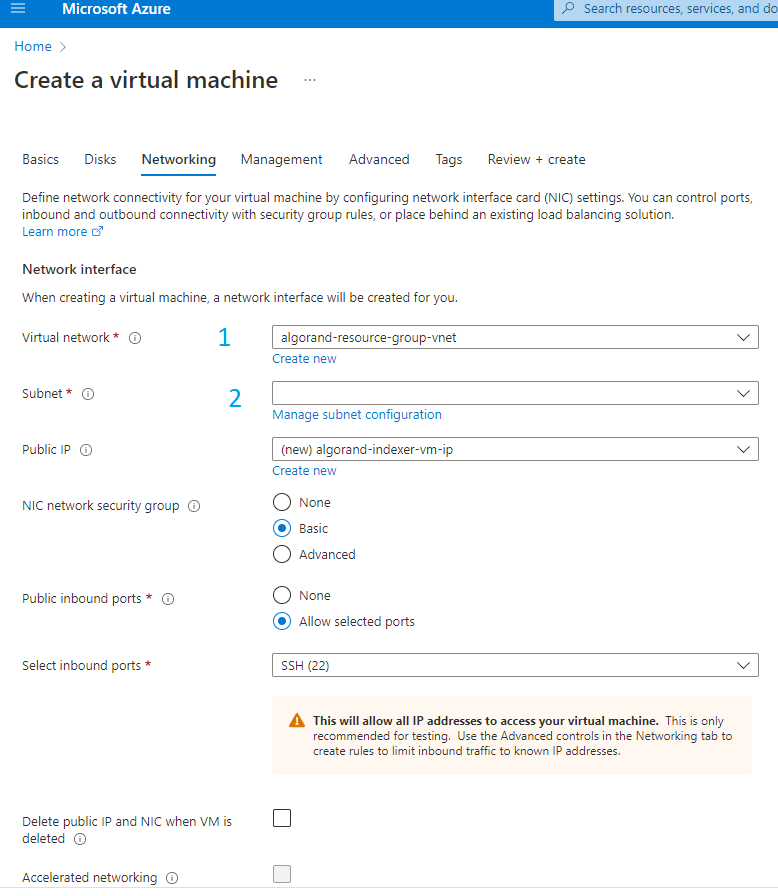
Figure 3-6 Network configuration for VM
- 1 Select the virtual network created for the flexible server.
- 2 Click “Manage subnet configuration” to create a new subnet.
The last action will open a new page where we are going to create a new subnet. But before that, we need to update the virtual network configuration. When we created the flexible server on step 2, we decided to create a new VNet and a new subnet, but both of them used the same address space, which is the set of IP addresses available in the network. We therefore need to enlarge the virtual network address space to be able to create another subnet. As shown in figure 3-7, click on “Address space”, then click on the IP address range that appears and update it to the value shown in figure 3-7, then click save.
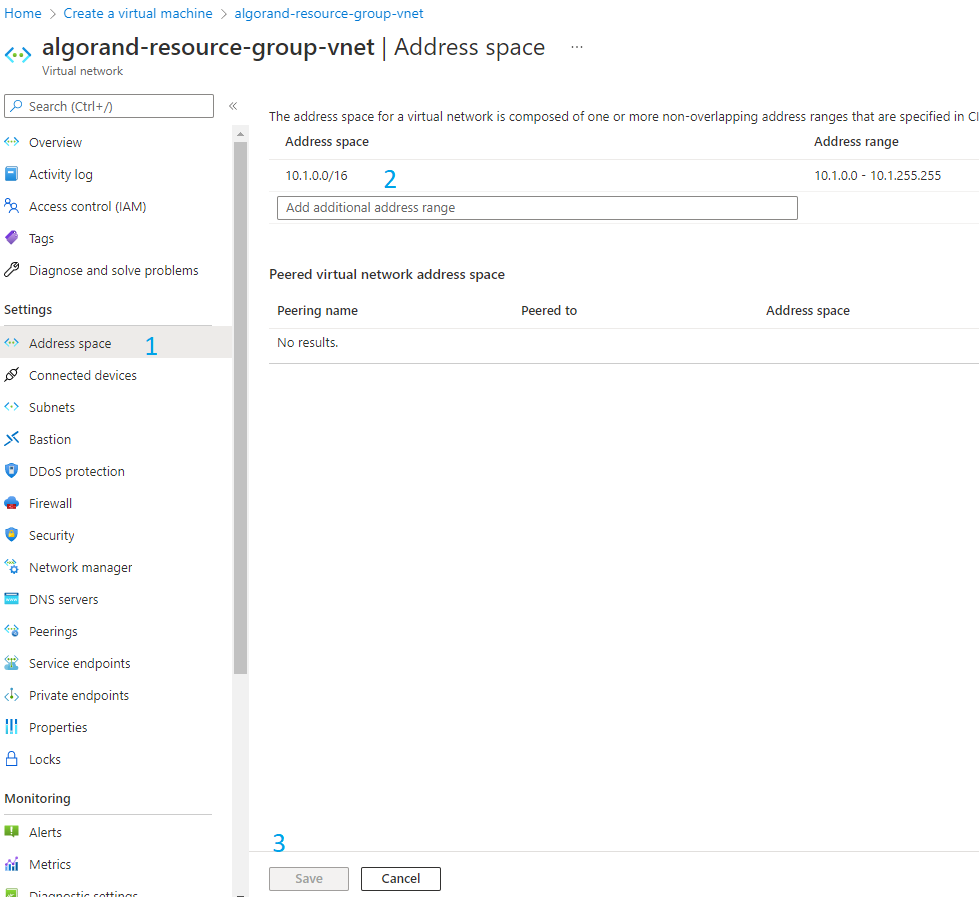
Figure 3-7 Update Virtual Network address space
Now click on the “Subnet” menu on the left of the page and click on “+ Subnet” to add a subnet.
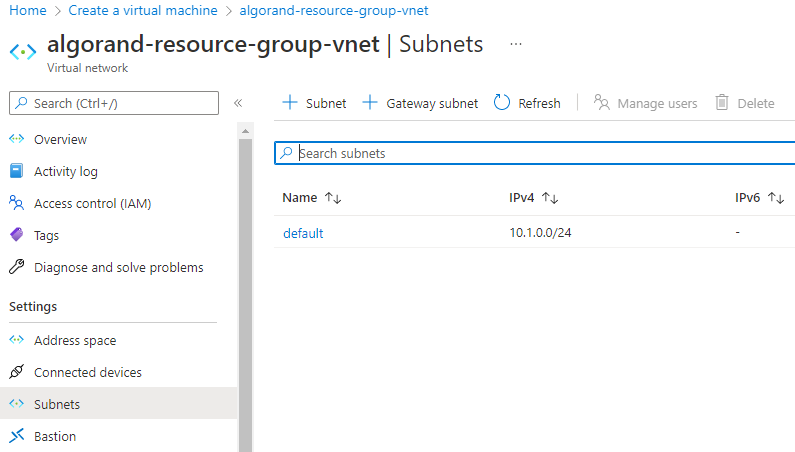
Figure 3-8 Initiate Subnet creation
Enter the information as shown on figure 3-9 and click Save.
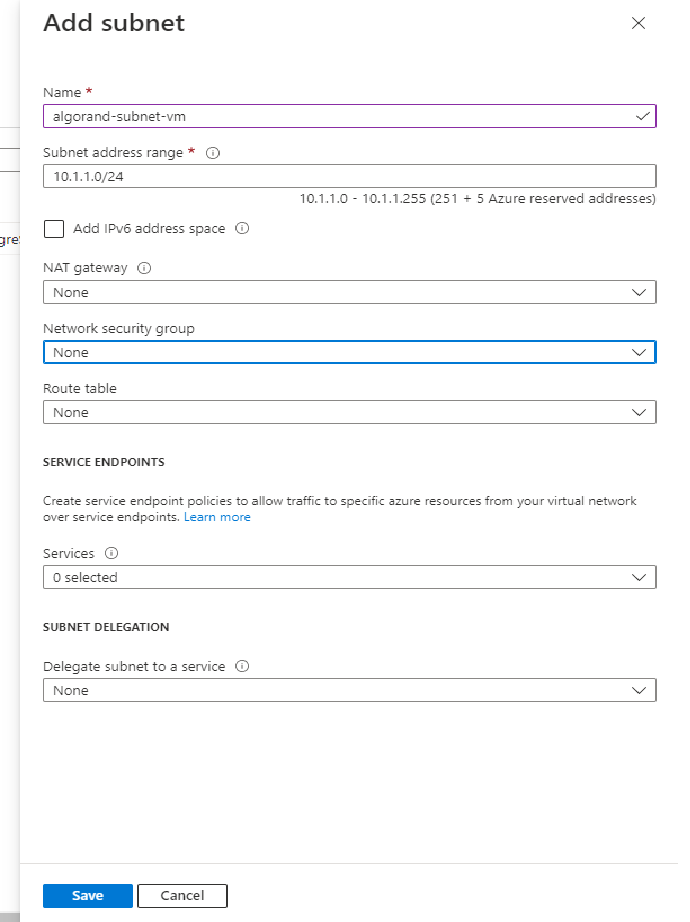
Figure 3-9 Subnet info
You now need to go back to the virtual machine creation flow to continue. Click on “Create a virtual machine” link as shown by the arrow in on figure 3-10
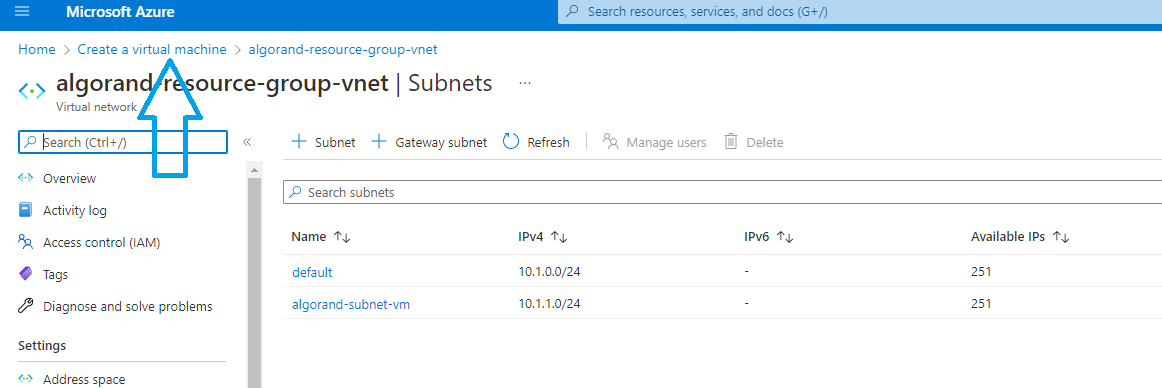
Figure 3-10 Go back to the virtual machine creation.
You are back to the main flow and can now select the new subnet you just created. Keep the default value for Public IP. A new IP address will be generated. Note that the default type of IP created here is Dynamic IP. It means that if you ever stop your vm and restart it, a new IP will be used. You may want to create a static IP address that will be used even after a stop/start of the VM. In such case, click on the “Create new” (figure 3-11) link and follow the guide
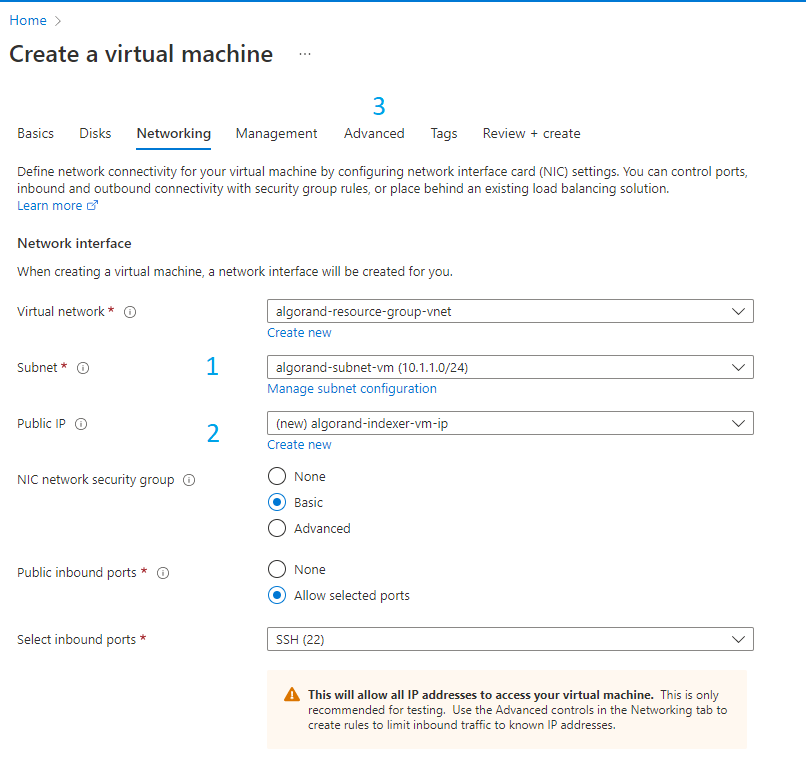
Figure 3-11 Network configuration
Click on the Advanced tab as shown on figure 3-11 to configure the custom data. Custom data allows you to pass a cloud init initialization file that will run once your vm has been created. We use it here to download Algorand Indexer binaries and install them. The content to use for the input field of figure 3-12 below can be found in the github repository of the azure cli version of this tutorial.
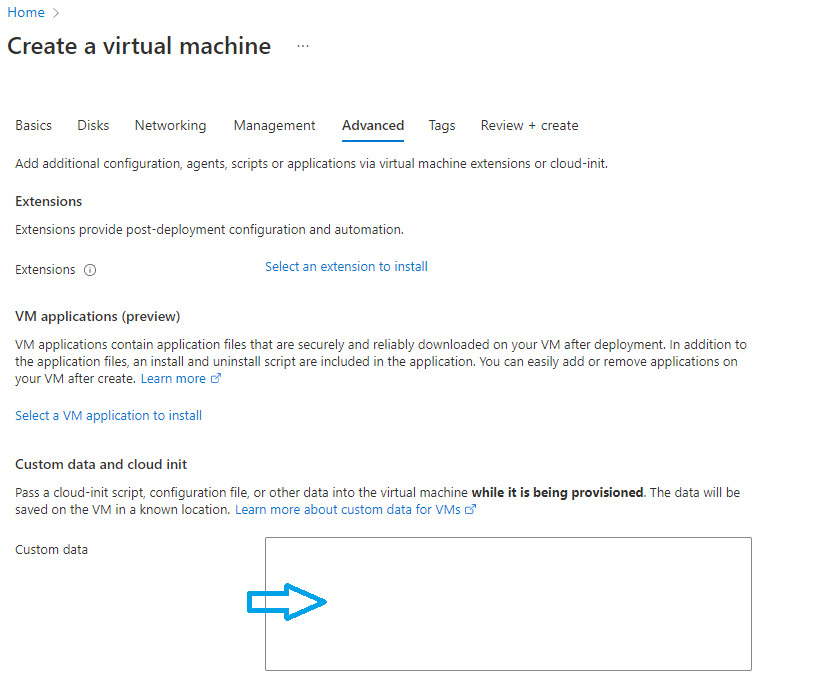
Figure 3-12 Custom data
You can now go to the “Review + create” tab and create the vm. When done, your vm will appear in the list of virtual machines as displayed on figure 3-13
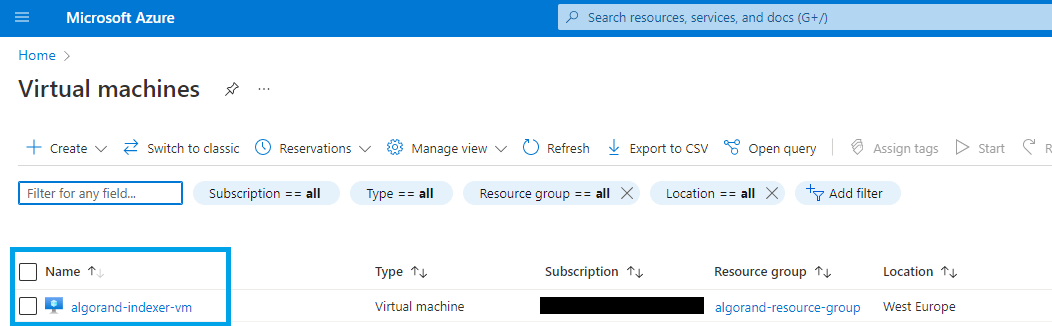
Figure 3-13 Virtual machines list
To connect to the vm to run the indexer binaries, click on the vm name and get the IP address (figure 3-14)

Figure 3-14 Virtual machine IP address
Now, using a ssh client, connect to the virtual machine. For example, you can use
ssh -i /home/<user>/.ssh/<ssh_private_key_path> algoranduser@<vm_ip_adress>
and the run the Algorand indexer binaries (installed with the custom data provided during the vm provisioning) using
cd /home/algoranduser/indexer
./algorand-indexer daemon -P "host=algorand-indexer-flexible-server.postgres.database.azure.com port=5432 user=algorandindexer password= dbname=postgres sslmode=require" --algod-net="archive_node_url" --algod-token="archive_node_token_access" --genesis [path_to_genesis_file]  --data-dir [path_to_data_dir]
Note that the process will run for a few days to complete if you run it on BetaNet, TestNet or MainNet. The --algo-net parameter must reference an archive node. Fast catchup node will not work here. In case you don’t have access to an archive node, you can use API services such as Purestake and AlgoExplorer for
fully archived nodes as well.
4. Summary
In this tutorial, we covered the steps required to setup and run an Algorand Indexer on Microsoft Azure cloud, using Azure Portal. There is a version of this tutorial that uses Azure Cli, the command line interface of Azure, and then Azure ARM templates created by exporting all the resources. This option enables the versioning of your resource.
Note that topics like high availability were not covered in this tutorial which is provided for learning purpose and is not intended to run production ready infrastructure.