Simple example using Algorand with Unity 3D Engine

Overview
There are numerous Virtual Worlds based on Blockchain such as Decentraland, Cryptovoxels and many others. Being able to use an SDK to integrate the functionality of a blockchain like Algorand is the first step towards creating secure micro payments within a virtual environment recreated by the 3D graphics engine. This stub shows how to develop a very simple example of player’s 3D coin game, based on collision with a “Coin” mesh.
Requirements
- Unity 3D (Suggest using version 2019.4.14f1 Personal Edition)
- Algorand SDK .NET
- (optional) Open Source Unity Assets like:
- Hover.cs Script by jeffcrouse
- https://assetstore.unity.com/packages/2d/textures-materials/gridbox-prototype-materials-129127
- https://github.com/Pheffers/UnityCameraExample
- https://github.com/UnityCommunity/UnitySingleton
Special thanks to ManHunter for his “A little and simple background tasks processor for Unity” created for this demo (MIT License) (https://github.com/manhunterita).
In the example we use Purestake Algorand Public Node in TESTNET. It is more convenient for a possible final application in Unity to use a remote system such as Purestake by creating the various Algorand transactions locally via the .NET SDK.
Create a new Unity project for Algorand test
It is very easy to create a new Unity Project using Unity Hub:
- Run Unity Hub.
- Choose “New” Button.
- Select Project directory and name, like “AlgorandUnityTest” or “AlgoranUnityExample” and press “Create” button.
- Unity will start creating your scaffolded project and open the Unity Editor at the end.

How to install Algorand .NET DLL in Unity
There are several ways to install the necessary .NET libraries. One of the simplest is to build a small console project for .NET and test the basic functioning of its SDK for .NET. In this regard, see the following links:
I quote from README FILE (https://rileyge.github.io/dotnet-algorand-sdk/README.html):
dotnet-algorand-sdk is a dotnet library for communicating and interacting with the Algorand network. It contains a REST client for accessing algod instances over the web, and also exposes functionality for mnemonics, creating transactions, signing transactions, and serializing data across the network.
Please find documents of dotnet-algorand-sdk on https://rileyge.github.io/dotnet-algorand-sdk/. You can find more Chinese resource from https://developer.algorand.org/zh-hans/
1. Prerequisites
This library is compliant to .Net Standard 2.0.
2. How to Install
Open the NuGet command line and type:
Install-Package Algorand
To create a project in Visual Studio follow these steps (https://visualstudio.microsoft.com/it/vs/community/):
- File -> New -> Project -> App Console (.NET Framework) On Visual C# Project.
- Select name of project and directory.
- On “Solution Explorer” go to “References” and click “Right Mouse Button” to activate Menu.
- On menu select “Manage Nuget Packages”.
- Write “Algorand” and “Install”.
- To test, create a very simple Console program derived from here and click Build.
- In your Bin (Release or Debug) you can see all DLL .Net libraries used for Unity.
using System;
using System.Collections.Generic;
using System.Linq;
using System.Text;
using System.Threading.Tasks;

//ALGORAND
using Algorand;
using Algorand.V2;
using Algorand.Client;
using Algorand.V2.Model;
using Account = Algorand.Account;

namespace ConsoleAlgorand
{
    class Program
    {
        static void Main(string[] args)
        {
            string ALGOD_API_ADDR = "https://testnet-algorand.api.purestake.io/ps2";
            if (ALGOD_API_ADDR.IndexOf("//") == -1)
            {
                ALGOD_API_ADDR = "http://" + ALGOD_API_ADDR;
            }

            //WARNING: **Replace with your correct Token, this is only an example**
            string ALGOD_API_TOKEN = "Your API Key Here";
            string SRC_ACCOUNT = "typical permit hurdle hat song detail cattle merge oxygen crowd arctic cargo smooth fly rice vacuum lounge yard frown predict west wife latin absent cup";
            string DEST_ADDR = "KV2XGKMXGYJ6PWYQA5374BYIQBL3ONRMSIARPCFCJEAMAHQEVYPB7PL3KU";
            if (!Address.IsValid(DEST_ADDR))
                Console.WriteLine("The address " + DEST_ADDR + " is not valid!");
            Account src = new Account(SRC_ACCOUNT);
            Console.WriteLine("My account address is:" + src.Address.ToString());

            AlgodApi algodApiInstance = new AlgodApi(ALGOD_API_ADDR, ALGOD_API_TOKEN);

            try
            {
                var supply = algodApiInstance.GetSupply();
                Console.WriteLine("Total Algorand Supply: " + supply.TotalMoney);
                Console.WriteLine("Online Algorand Supply: " + supply.OnlineMoney);
                var task = algodApiInstance.GetSupplyAsync();
                task.Wait();
                Console.WriteLine("Total Algorand Supply(Async): " + task.Result.TotalMoney);
            }
            catch (ApiException e)
            {
                Console.WriteLine("Exception when calling algod#getSupply:" + e.Message);
            }

            var accountInfo = algodApiInstance.AccountInformation(src.Address.ToString());
            Console.WriteLine(string.Format("Account Balance: {0} microAlgos", accountInfo.Amount));

            try
            {
                var trans = algodApiInstance.TransactionParams();
                var lr = trans.LastRound;
                var block = algodApiInstance.GetBlock(lr);

                Console.WriteLine("Lastround: " + trans.LastRound.ToString());
                Console.WriteLine("Block txns: " + block.Block.ToString());
            }
            catch (ApiException e)
            {
                Console.WriteLine("Exception when calling algod#getSupply:" + e.Message);
            }

            TransactionParametersResponse transParams;
            try
            {
                transParams = algodApiInstance.TransactionParams();
            }
            catch (ApiException e)
            {
                throw new Exception("Could not get params", e);
            }
            var amount = Utils.AlgosToMicroalgos(1);
            var tx = Utils.GetPaymentTransaction(src.Address, new Address(DEST_ADDR), amount, "pay message", transParams);
            var signedTx = src.SignTransaction(tx);

            Console.WriteLine("Signed transaction with txid: " + signedTx.transactionID);

            // send the transaction to the network
            try
            {
                var id = Utils.SubmitTransaction(algodApiInstance, signedTx);
                Console.WriteLine("Successfully sent tx with id: " + id.TxId);
                var resp = Utils.WaitTransactionToComplete(algodApiInstance, id.TxId);
                Console.WriteLine("Confirmed Round is: " + resp.ConfirmedRound);
            }
            catch (ApiException e)
            {
                // This is generally expected, but should give us an informative error message.
                Console.WriteLine("Exception when calling algod#rawTransaction: " + e.Message);
            }
            Console.WriteLine("You have successefully arrived the end of this test, please press and key to exist.");
            Console.ReadKey();
        }
    }
}
The last very important step is to copy all the contents of the directory (except of course the executable .exe created) in a special folder created in the Unity project with the name “Plugins”.
Create and use an Algorand Manager for Unity
To be able to interface with a single Manager, we create a special Singleton class that will act as AlgorandManager, a method to be invoked will activate the creation of the payment and signature transaction and its relative propagation.
- Create a new directory in your Assets named “Scripts” on “Project” window using “Right Mouse Button” to activate Menu.

- Create a new C# Script on “Assets/Scripts” directory using “Right Mouse Button” to activate Menu and choose: Create -> C# Script.
- Name it “AlgorandManager”.
- Edit it using Visual Studio clicking on file name twice.
- In Visual Studio modify template file with this code:
using System.Collections;
using System.Collections.Generic;
using System;
using UnityEngine;

//ALGORAND
using Algorand;
using Algorand.V2;
using Algorand.Client;
using Algorand.V2.Model;
using Account = Algorand.Account;

public class AlgorandManager : Singleton<AlgorandManager>
{
    [SerializeField]
    protected string m_PlayerName;

    /// <summary>
    /// GetPlayerName()
    /// </summary>
    /// <returns>PlayerName</returns>
    public string GetPlayerName()
    {
        return m_PlayerName;
    }

    //Function
    public void PayPlayerwithAlgorandFunction()
    {
        Debug.Log("Starting Algorand Transaction.");
        string ALGOD_API_ADDR = "https://testnet-algorand.api.purestake.io/ps2";
        if (ALGOD_API_ADDR.IndexOf("//") == -1)
        {
            ALGOD_API_ADDR = "http://" + ALGOD_API_ADDR;
        }

        //WARNING: **Replace with your correct Token, this is only an example**
        string ALGOD_API_TOKEN = "Your API Key Here";
        string SRC_ACCOUNT = "typical permit hurdle hat song detail cattle merge oxygen crowd arctic cargo smooth fly rice vacuum lounge yard frown predict west wife latin absent cup";
        string DEST_ADDR = "KV2XGKMXGYJ6PWYQA5374BYIQBL3ONRMSIARPCFCJEAMAHQEVYPB7PL3KU";
        if (!Address.IsValid(DEST_ADDR))
            Debug.LogError("The address " + DEST_ADDR + " is not valid!");
        Account src = new Account(SRC_ACCOUNT);
        Debug.Log("My account address is:" + src.Address.ToString());

        AlgodApi algodApiInstance = new AlgodApi(ALGOD_API_ADDR, ALGOD_API_TOKEN);

        TransactionParametersResponse transParams;
        try
        {
            transParams = algodApiInstance.TransactionParams();
        }
        catch (ApiException e)
        {
            throw new Exception("Could not get params", e);
        }
        var amount = Utils.AlgosToMicroalgos(0.01);
        var tx = Utils.GetPaymentTransaction(src.Address, new Address(DEST_ADDR), amount, "pay message", transParams);
        var signedTx = src.SignTransaction(tx);

        Debug.Log("Signed transaction with txid: " + signedTx.transactionID);

        // send the transaction to the network
        try
        {
            var id = Utils.SubmitTransaction(algodApiInstance, signedTx);
            Debug.Log("Successfully sent tx with id: " + id.TxId);
            var resp = Utils.WaitTransactionToComplete(algodApiInstance, id.TxId);
            Debug.Log("Confirmed Round is: " + resp.ConfirmedRound);
        }
        catch (ApiException e)
        {
            // This is generally expected, but should give us an informative error message.
            Debug.LogError("Exception when calling algod#rawTransaction: " + e.Message);
        }
        Debug.Log("Algorand transaction to Player completed.");
    }
}
As you can see, I used the https://github.com/UnityCommunity/UnitySingleton code to create a singleton and put the test code used in the library SDK .NET (https://github.com/RileyGe/dotnet-algorand-sdk/blob/master/sdk-examples/V2/BasicExample.cs) into the “PayPlayerwithAlgorandFunction()” method.
Use collision to activate transfer Algorand transaction
In this demo we will make sure that every time the Player collides a coin, 0.01 Algo will automatically be transferred from the sample address to the player’s Algo address. A related Algorand transaction will then be created and signed locally and then propagated through the Purestake services on the Algorand TESTNET network.
WARNING: Always check that the address has a balance sheet, otherwise use “https://bank.testnet.algorand.network/" to upload new Algos to the test address. Given the intense use of this address, there may be error reports for the purpose of the available Algos. (See: https://testnet.algoexplorer.io/address/PVT67ZSBADU5ATXRIYBRIDBWSOIJOJJR73FJPCUFSKPHXI4M7PIRS5SRRI)
-
Create a new Cylinder GameObject using Main Unity 3D Menu.

-
Modify GameObject with “Scale Tools” to give it a coin shape. You can select the GameObject created, press “R” to use “Scale Tools” and use Y axis with the mouse to flip the cylinder shape until it becomes a coin.

-
Create a new yellow Material, so make a directory under your main Directory “Assets” named “Materials”. Select Materials directory and press Right Button to activate the contest menu and choose “Create” -> “Material” with name “Yellow”, then click and go to the color pallet and pick yellow. At the end assign it to the object by dragging it onto the GameObject with coin form in scenes.

-
To rotate and float the object in the scene, go to the Inspector (after downloading and copying the C # Script Hover in the Scripts folder) and press “Add component”. See or download code script from: Hover.cs Upon selection indicate the script as “Hover” as in the image below:

-
The time has come to create the script that will be activated at the time of a possible connection with the Player. Make sure that the “IsTrigger” property is checked:

-
Create a new C # script and assign it to the GameObject with “Add Component” or by dragging the script selected with “Drag & Drop” directly into the Inspector of the selected Coin object.
using System.Collections;
using System.Collections.Generic;
using UnityEngine;
using MHLab.Utilities;

public class CoinCollider : MonoBehaviour
{
    public BackgroundTasksProcessor Processor;

    public GameObject Coin;

    // Start is called before the first frame update
    void Start()
    {
        Debug.Log("Player Name: "+AlgorandManager.Instance.GetPlayerName());
    }

    void Update()
    {
        if (!Processor.IsReady)
        {
            return;
        }
    }

    void OnCollisionEnter(Collision collision)
    {
        GameObject otherObj = collision.gameObject;
        Debug.Log("Collided with: " + otherObj);
    }

    void OnTriggerEnter(Collider collider)
    {
        GameObject otherObj = collider.gameObject;
        Debug.Log("Triggered with: " + otherObj);
        //Using BackgroundTasksProcessor
        Processor.Process(
            () =>
            {
                AlgorandManager.Instance.PayPlayerwithAlgorandFunction();
                return "Algorand OK";
            },
            (result) =>
            {
                Debug.Log(result);
            }
        );
    }
}
Unfortunately it is not possible to directly call the method created in “AlgorandManager” Singleton class because the task is too expensive to be executed in the Unity Main Thread, so the possibility of allocating the task on a queue and then executed in a Thread in the background has been exploited.
It is very important for a correct functioning to modify the GameObject by adding the script “BackgroundTasksProcessor” and connecting the GameObject and the relative Script as shown in the configuration below:

To create a “Prefab” select the object in “Scenes” and drag it to a special folder that you will call “Prefabs”. From this moment you can “copy” the Prefab object where you want in the scene of your Demo.
Test and play
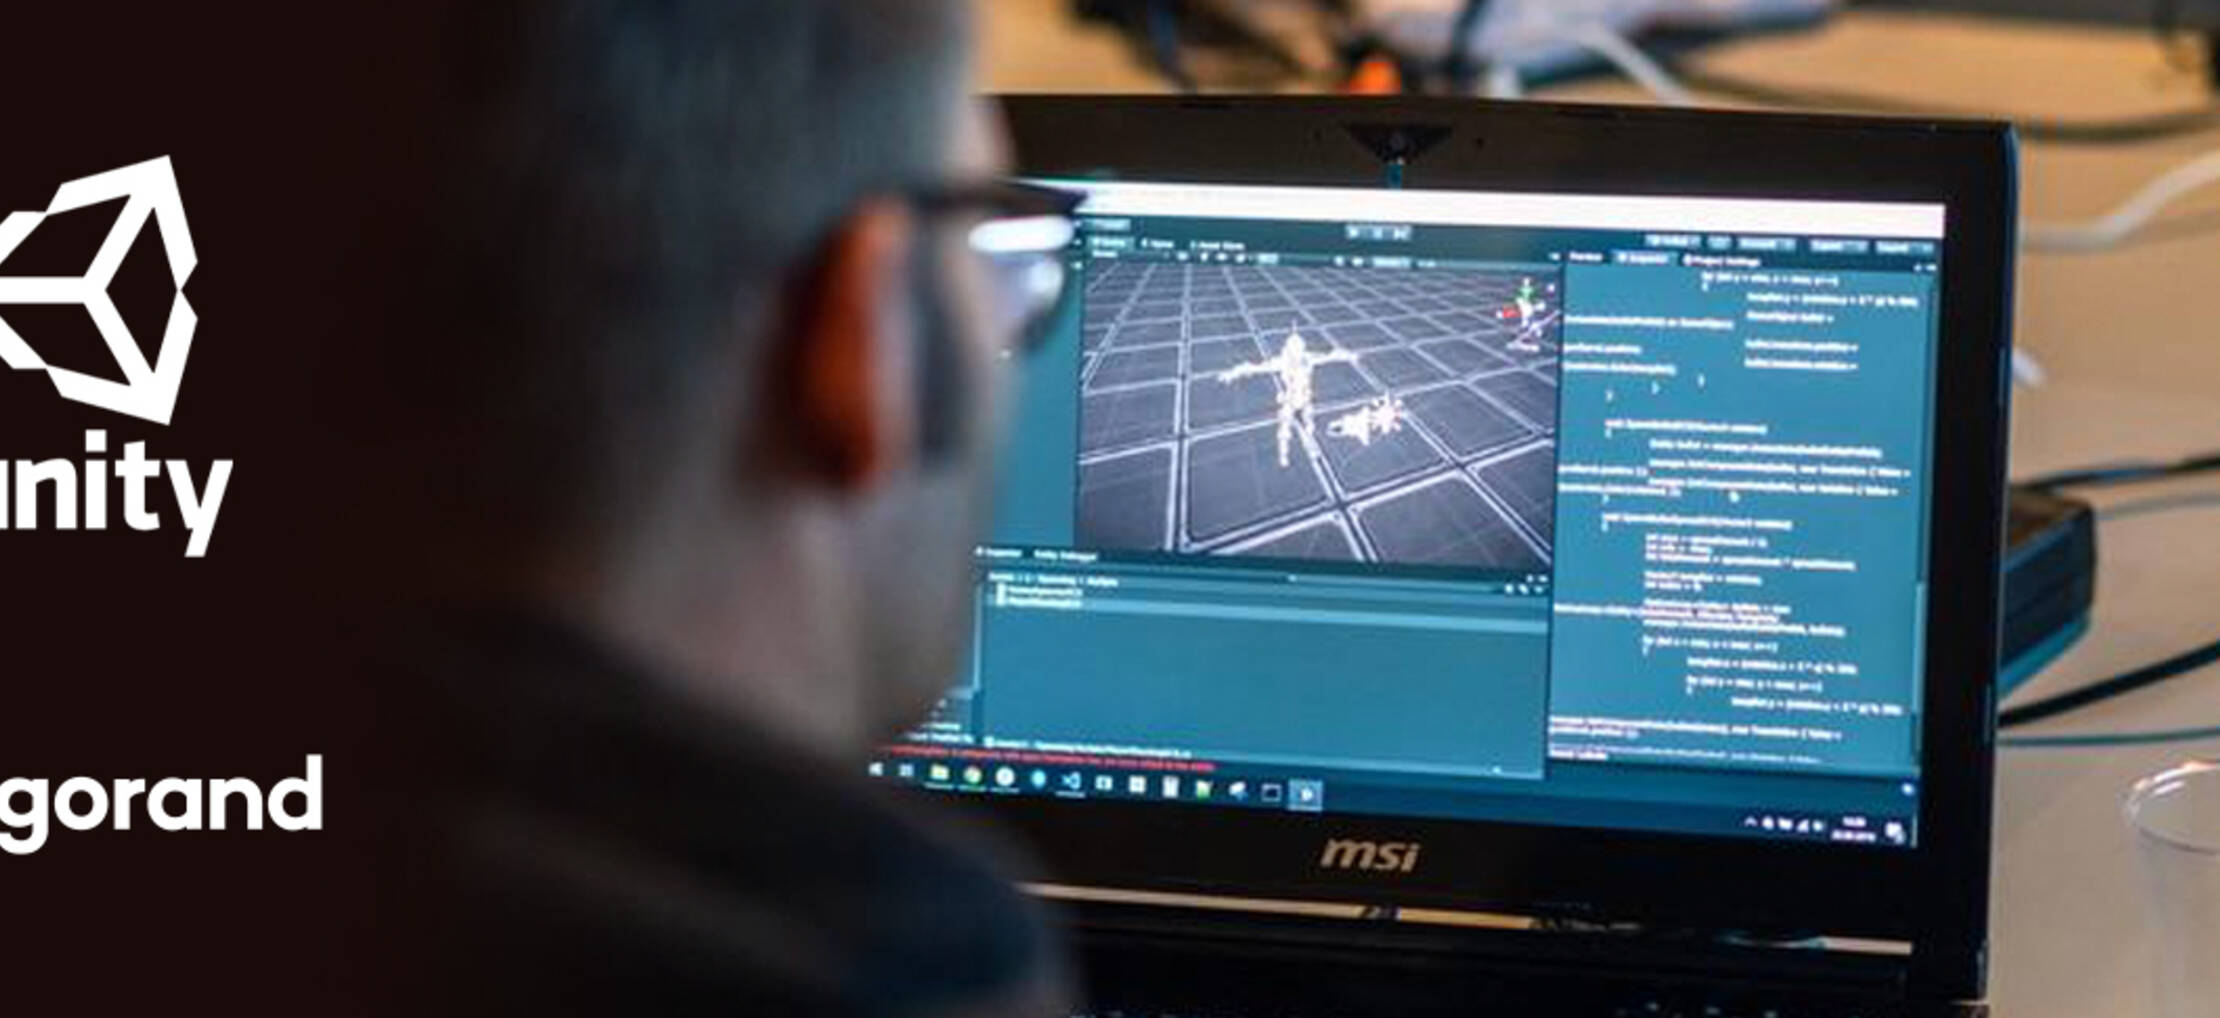
To check the functioning of our game demo start the game with the appropriate Unity Play button. After a few seconds you can move the player with the classic WASD combination or with the arrow keys. By making the player move you will have to go towards the “spinning coins” thus activating and “earning” the character the amount of 0.01 Algo for each collision. You can verify the actual transaction by observing the various Debug.Log messages in the “Console” window as you can see in the image below:

If you want to test a builded working Demo see and download from: AlgorandUnityDemoTest.Windows.x64.v0.1.zip
or AlgorandUnityDemoTest.Mac.x64.v0.1.zip
Info
If you want the transactions carried out to be visible at runtime (without using the Unity internal log console) you can use the free ScreeLogger component from the Unity Asset Store as provided in the NewFeatures branch.