
Decentralized Two-Factor Authentication With Algorand Standard Assets

Overview
Two factor authentication is offered with an ever increasing frequency as a strongly recommended option for online accounts. Why is that the case? Because it eliminates almost all account takeovers, as shown by Google security team’s research. You may wonder, what’s wrong with today’s two-factor authentication methods? You are most likely using one of two options: Google Authenticator, or SMS verification.
SMS verification means that you fundamentally trust whichever SMS gateway the website is using, your mobile carrier, their radio access equipment, as well as your mobile device. All of the aforementioned parties are susceptible to both malware and eavesdropping, and thus many people today choose to use third-party “trusted” authenticator apps. But that does not completely solve the problem. Google Authenticator, as well as many other similar apps, have not yet encountered any major security threats. That does not mean, though, that they are risk free, especially as they gain popularity and become bigger targets. And in both cases, your anonymity is based on the level of trust you put on either of these parties.
A decentralized solution, like one running on top of a blockchain network still provides security, but also takes the service out of the hands of a single provider. How hard can it be to create such a system? Let’s find out by building such a system using Algorand Standard Assets, the layer 1 system allowing anybody to create their own asset with the same benefits as native Algos.
Structure
We will be using an Algorand Standard Asset as the means of authentication. Each client will have an account which owns a single asset, and sends that asset to a provider to verify their identity. The project will be split into two parts: the client will handle an Algorand account, and the provider will keep track of registered users, as well as their asset index.
Algorand Standard Assets, or ASA, are a feature on layer 1 which allows anybody to create unique assets with the same simplicity and security as Algos. All Algorand SDKs contain an API for manipulating assets, which will be used in this project. More information on the API can be found here, and a more detailed introduction to assets can be found here.
Setup for a user is similar to a typical 2 factor service. A code is provided by the client program, which is given to the provider. The client must approve the provider, and then logging in is as simple as initiating login from the same provider, and authorizing it from the client program.
The full code for this project is (will be, or will be moved elsewhere) available on github, and a diagram of the structure is available here.
Requirements
The topics covered here expect an introductory knowledge of Javascript, and websocket concepts. Additionally, some prior experience with the Algorand SDK is highly suggested.
You will need a relatively recent version of NodeJS and NPM, as well as access to a fully synchronized TestNet node. Purestake and the Algorand sandbox are both good options for accessing a node API quickly.
The Client
The client, controlled by the user, is in charge of the following:
1. Managing the underlying Algorand account and Algorand Standard Asset (just referred to as an asset from now on).
2. Keeping track of approved providers.
3. Sending authorization to providers when the client logs in.
Project Setup
The client will be a command line application written in Javascript. We will begin by creating a new project using NPM.
npm init -y
We want this to be executable via a2f ..., so we will need to edit the package.json. Notably, the main attribute is replaced with bin, and the rest can be filled in to your circumstances.
{
  "name": "a2f-client",
  "version": "1.0.0",
  "description": "A client for an Algorand 2 factor implementation",
  "bin": {
    "a2f": "./index.js"
  },
  "scripts": {},
  "author": "Matt Worzala",
  "license": "MIT"
}
To make the program executable, we will use npm-link, more information can be found here. We will be using two dependencies: algosdk and platform-folders. They can be installed using npm as follows:
sudo npm link
npm i algosdk --save
npm i platform-folders --save
Tip
npm-link must be executed with administrator permissions.
At this point we can test the project setup to ensure that everything is working correctly. Create a file called index.js in the project folder and add the following:
#!/usr/bin/env node
// client index.js

console.log('Hello, World');
Running a2f in a terminal should print the Hello, World we just wrote. This can be deleted if it works correctly.
$ a2f
Hello, World
Finally, we will define some requirements and constants to be used later in the application.
const algosdk = require('algosdk');
const {getHomeFolder} = require('platform-folders');
const {join} = require('path');
const fs = require('fs');
const rl = require('readline').createInterface({ input: process.stdin, output: process.stdout });

const ALGOD_ADDRESS = 'http://127.0.0.1';
const ALGOD_PORT = 4001;
const ALGOD_TOKEN = 'aaaaaaaaaaaaaaaaaaaaaaaaaaaaaaaaaaaaaaaaaaaaaaaaaaaaaaaaaaaaaaaa'

const dataFile = join(getHomeFolder(), '.a2f');
const algod = new algosdk.Algod(ALGOD_TOKEN, ALGOD_ADDRESS, ALGOD_PORT);

(async () => {
    // Project code here
})();
The daemon information corresponds to a local node running in the sandbox; however this may differ if you are using another solution. We are placing the remainder of the project in an async function because many of the functions in the Algorand SDK are promise based, though we will be using synchronous file io.
Info
There are calls to a repeat function, which is not included here for sake of length, however it can be found here in the github repository.
Account and ASA
The client application manages an Algorand account associated with the user, as well as keeping track of providers.
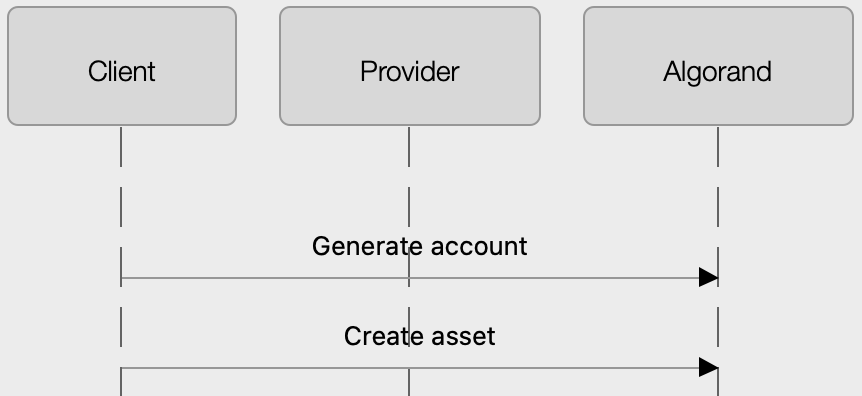
We will start by setting up an account if the data file does not exist. We need to create an account and then create an asset for that account. Any transactions on the Algorand network, whether they are asset configurations or Algo transfers have a fee, meaning the account must be funded before it can be used. We are using TestNet, so we can use the dispenser to fund our accounts.
if (!fs.existsSync(dataFile)) {
   console.log("Unable to locate existing user data... Running first time setup");
   const account = algosdk.generateAccount();

   console.log(`\nPlease visit https://bank.testnet.algorand.network/ to fund your account.\nYour address is ${account.addr}.`);
   await repeat(async () => {
       const info = await algod.accountInformation(account.addr);
       if (info.amount !== 0)
           return true;
       process.stdout.write('.');
   });
   console.log();
}
We will check the balance of the generated account until we know that it has been funded. The next step is to create the asset itself. This is done with the makeAssetCreateTxn function in the SDK, and then much like the account funding we will wait until the asset has been created (the block containing our transaction has been written.)
process.stdout.write('\nCreating verification asset.');
const params = await algod.getTransactionParams();
const createTxn = algosdk.makeAssetCreateTxn(
   account.addr,
   params.fee, params.lastRound, params.lastRound + 50,
   undefined, params.genesishashb64, params.genesisID,
   1e6, 0, false,
   account.addr, '', account.addr, account.addr,
   account.addr.substring(0, 8),
   'a2f-' + account.addr.substring(0, 8),
   'https://github.com/mworzala/algorand2factor', undefined
);
const sCreateTxn = createTxn.signTxn(account.sk);
await algod.sendRawTransaction(sCreateTxn);

const asset = await repeat(async () => {
   const info = await algod.accountInformation(account.addr);
   if (info.assets)
       return parseInt(Object.keys(info.assets)[0]);
   process.stdout.write('.')
});
console.log();
Now that we have an account (with a balance) as well as an asset we can use for verification, we will save the app data to our data file and continue with the program execution as usual.
const rawData = {
   account: algosdk.secretKeyToMnemonic(account.sk),
   asset,
   providers: {},
};
fs.writeFileSync(dataFile, JSON.stringify(rawData));

console.log('Completed first time setup.\n');
Info
The program uses a very basic command system consisting of a set of functions called when an associated key is inputted. More information can be seen in the repository.
Provider
The next major component of the client app is handing providers. Providers are stored in an object where each key is the name of a provider, and the value is the provider’s account address.
Adding a new provider consists of a short back-and-forth between the provider and the client. When signing up to a provider, the client first initializes their registration with the client app by running the new command. This command reveals their asset ID index (which is required by the provider), as well as starts a rolling check through the upcoming blocks until it detects a valid set of provider information. A diagram of the interaction can be seen below.
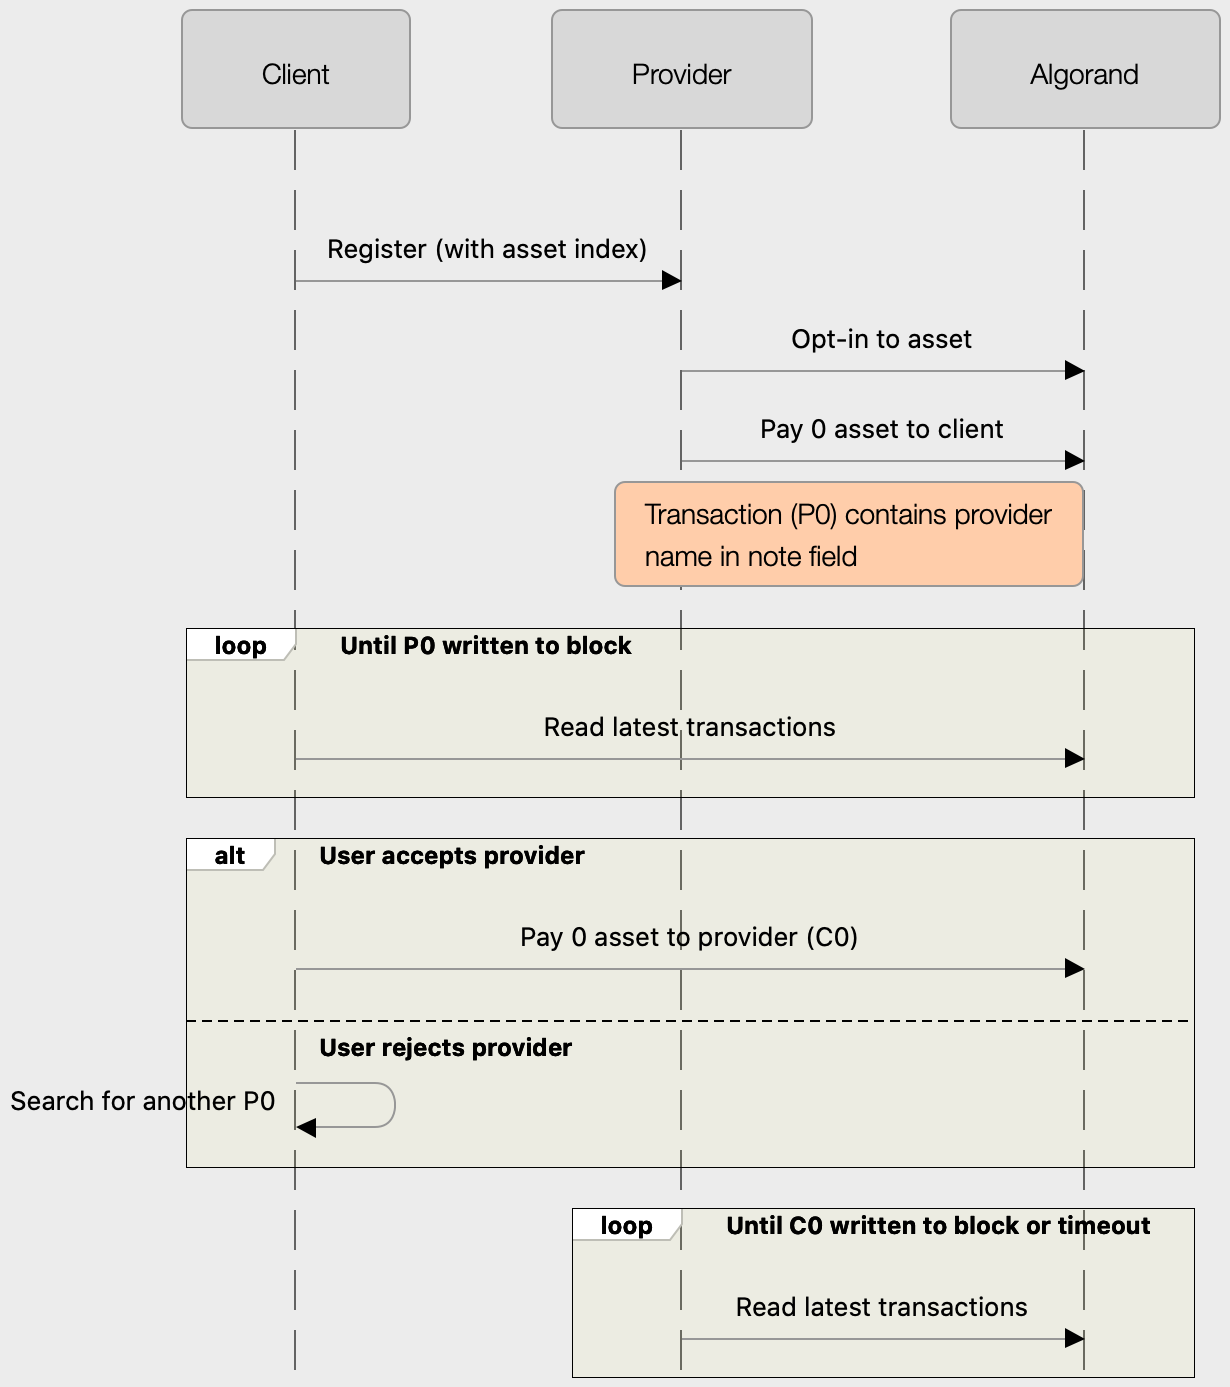
Provider information is sent in the note field of an asset transaction of 0 units from the provider account to the client account (P0).
process.stdout.write('Waiting for provider information.');
let lastCheck = -1;
const provider = await repeat(async () => {
   process.stdout.write('.');
   const params = await algod.getTransactionParams();
   if (lastCheck === -1)
       lastCheck = params.lastRound - 1;

   const txns = await algod.transactionByAddress(data.account.addr, lastCheck, params.lastRound);
   lastCheck = params.lastRound;

   if (!txns.transactions)
       return;
   for (let i = 0; i < txns.transactions.length; i++) {
       const txn = txns.transactions[i];
       if (txn.type !== 'axfer' || txn.curxfer.rcv !== data.account.addr || txn.curxfer.amt !== 0 || !txn.note)
           continue;
       const note = new TextDecoder().decode(txn.note);
       return {
           address: txn.from,
           name: note,
       };
   }
});
console.log();
Info
Using a rolling check in this manner requires the client to run the new command before creating their account. To help this problem, you could make the rolling check start X number of rounds behind, which would check ~4X seconds in the past.
Once we detect valid information, the user is prompted to authorize the provider, or we continue waiting for another provider to send its information.
const auth = await new Promise(
   resolve => rl.question('Provider \'' + provider.name + '\' has initiated authorization. Accept provider? (y/n)',
           ans => resolve(ans.toLowerCase() === 'y')));
if (!auth) {
   console.log('Ignored.');
   return await add();
}
If the provider is accepted, we add it to the providers object and send an acceptance transaction back to the provider. An acceptance transaction is an asset transaction of 0 units from the client account to the provider account.
data.providers[provider.name] = provider.address;

const params = await algod.getTransactionParams();
const approvalTxn = algosdk.makeAssetTransferTxn(
   data.account.addr, provider.address,
   undefined, undefined,
   params.fee, 0,
   params.lastRound, params.lastRound + 1000,
   undefined, params.genesishashb64, params.genesisID,
   data.asset
);

const sApprovalTxn = approvalTxn.signTxn(data.account.sk);
await algod.sendRawTransaction(sApprovalTxn);
Authorization
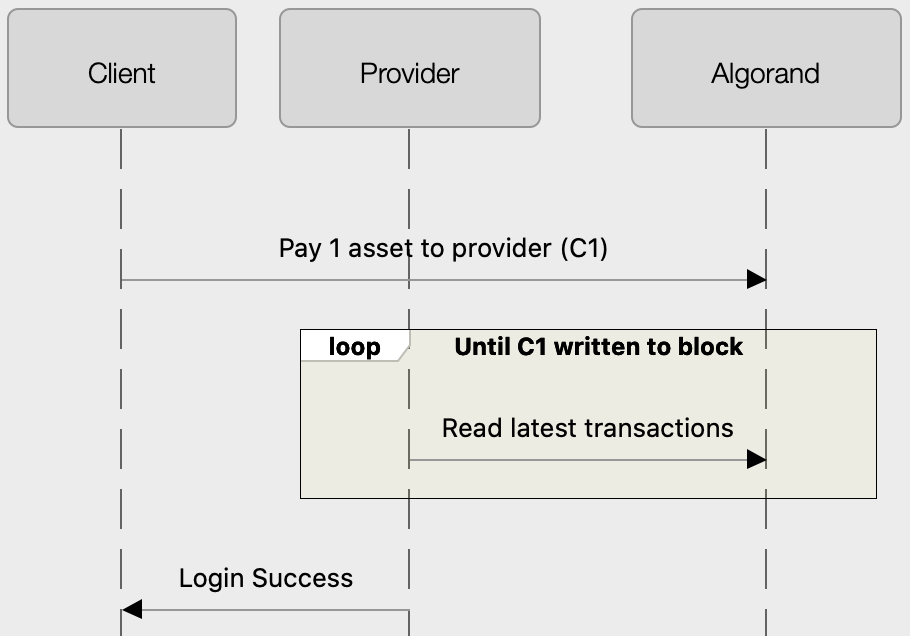
Compared to initialization, authorization of a provider is quite simple. Authorization consists of a single transaction from the client account to the provider account with an amount of 1. A diagram of this interaction can be seen below.
const params = await algod.getTransactionParams();
const providerAddress = data.providers[args[0]];

const verifyTxn = algosdk.makeAssetTransferTxn(
   data.account.addr, providerAddress,
   undefined, undefined,
   params.fee, 1,
   params.lastRound, params.lastRound + 50,
   undefined, params.genesishashb64, params.genesisID, data.asset
);

const sVerifyTxn = verifyTxn.signTxn(data.account.sk);
await (algod.sendRawTransaction(sVerifyTxn).catch(e => console.error(e)));
console.log('Sent verification to provider.');
This is very simple, however there is an issue which you may have already noticed. The asset which was sent to the provider is now in their account. The obvious issue is that the provider could transfer that asset elsewhere, which is true, but that would not be beneficial because the provider compares the owner of the asset to the account sending it. This means another account cannot authorize on your behalf, even if it has your token.
That is not where the problem ends, however. If the asset is not consistently returned, you could run out of tokens, in which case you would not be able to sign into any accounts. Our provider implementation returns the asset, however you cannot rely on a correct implementation, especially where security is concerned.
This implementation has not provided a solution to this issue, however one valid solution to the problem is using the clawback permission granted to the client account to force the asset back.
Info
Multiple segments of code have been excluded for the sake of brevity. Notably, there are commands to show debug information (account address, balance, etc.) list authorized providers, and remove providers. They can be found in the code repository.
The Provider
The example provider needs to implement the receiving end of the protocol described previously, and this will be done in the form of a very basic website. The backend of the website will be done with Express, and a websocket server. The frontend will be basic HTML and Javascript.
Login flow typically consists of a REST API, however we need long lasting connections because there can be a significant amount of time between the frontend requesting to log in and the backend confirming or denying the request. The solution used here is a websocket connection which closes with the result of the request.
Project Setup
Our provider implementation will be a NodeJS application, so we will create the project using NPM.
npm init -y
The package.json can be configured to your liking, however we do recommend setting a basic start script.
{
  "name": "a2f-provider",
  "version": "1.0.0",
  "description": "A provider for an Algorand 2 factor implementation",
  "main": "index.js",
  "scripts": {
    "start": "node index.js"
  },
  "author": "Matt Worzala",
  "license": "MIT"
}
There are a few dependencies required for the provider which should be installed at this time.
npm i algosdk --save
npm i express --save
npm i cookie-parser --save
npm i ws --save
The provider will need an account with a balance to make transactions, that will have to be created prior. I have included a short script to create an account and print it’s mnemonic. The script is here, however you can also create an account using goal, documented here.
Info
Make sure that the account is funded using the TestNet Dispenser.
We will accept the provider account mnemonic as an environment variable named PROVIDER_MNEMONIC. Additionally, we will include our dependencies and set some basic constants. Our implementation will not persist across runtime, so we are simply using an object to store all known accounts.
Info
In our implementation, PROVIDER_NAME must be unique, but a more advanced protocol would use a longer identifier, or even the provider account, and then have a separate display name.
const express = require('express');
const algosdk = require('algosdk');
const { join } = require('path');
const WebSocket = require('ws')

const ALGOD_ADDRESS = 'http://127.0.0.1';
const ALGOD_PORT = 4001;
const ALGOD_TOKEN = 'aaaaaaaaaaaaaaaaaaaaaaaaaaaaaaaaaaaaaaaaaaaaaaaaaaaaaaaaaaaaaaaa'

const PROVIDER_NAME = 'test_provider'

const publicDir = join(__dirname, 'public');
const app = express();
const algod = new algosdk.Algod(ALGOD_TOKEN, ALGOD_ADDRESS, ALGOD_PORT);
const account = algosdk.mnemonicToSecretKey(process.env.PROVIDER_MNEMONIC);
const accounts = {};
Express and Websocket Server
If you are not familiar with ExpressJS, please review its documentation, as it will not be covered in depth. We will create a server and apply the cookie-parser middleware which we installed previously. Our express-handled endpoints are GET /, and GET /default.js. The former will return either the ‘restricted’ (logged in) or ‘default’ (not logged in) page depending on whether the a2f cookie is set or not. The second of the two endpoints returns the Javascript associated with the default page, which handles the registration and login sequence. When the server is started, we keep track of the http server instance to be used in the websocket server.
CAN THIS BE A WARNING?
Info
This login system relies on a cookie simply for acceptance, which means that anybody can set the cookie manually and fake being logged in. This should never be done in a production setting, however appropriate security measures are beyond the scope of this article.
app.use(require('cookie-parser')());

app.get('/', (req, res) => {
   if (req.cookies.a2f)
       res.sendFile('restricted.html', { root: publicDir });
   else res.sendFile('default.html', { root: publicDir });
});

app.get('/default.js', (req, res) => res.sendFile('default.js', { root: publicDir }));

const server = app.listen(3000, () => {
   console.log('Example Provider');
   console.log('Name: ' + PROVIDER_NAME);
   console.log('Account: ' + account.addr);
   console.log('URL: http://127.0.0.1:3000/');
});
We only need to listen to the connection event of the websocket server, so setup is straightforward.
const createServer = new WebSocket.Server({ server, path: '/account' });

createServer.on('connection', ws => {
   ws.on('message', async msg => {
        // Handle registration and login sequence
   })
});
Registration
User registration from the provider side starts by opting into the asset. Next, the provider sends 0 of the asset to the client with the provider name, before waiting for a response from the client or timing out.
The majority of the registration process is handled by the backend of the website, however it is initialized by the frontend via a websocket message containing the name of the user and the asset index. The same process is used for logging in.
const name = nameInput.value.toLowerCase();
const asset = parseInt(codeInput.value);

const ws = new WebSocket('ws://localhost:3000/account');
ws.onopen = () => ws.send(JSON.stringify({ type: 'create', name, asset }));

ws.onclose = event => {
   unlockInput();
   switch (event.code) {
       case 4001:
           alert('Successfully created account! You may now login with your username (' + event.reason + ').');
           break;
       case 4002:
           alert(event.reason);
           break;
       default:
           alert('An unknown error has occurred. Check the console for more info!');
           console.error('An unknown error has occurred: Exit code ' + event.code);
           console.error(event.reason);
   }
}
We will start by ensuring that the asset provider actually exists. If not, stop the process immediately.
let assetInfo;
try {
    assetInfo = await algod.assetInformation(asset);
} catch (e) {
    ws.close(4002, 'Failed to locate asset');
    return;
}
Next, we opt-into the asset. Opting in consists of sending zero of the asset to yourself. This is documented in detail in the developer docs.
const params = await algod.getTransactionParams();
const optInTxn = algosdk.makeAssetTransferTxn(
    account.addr, account.addr,
    undefined, undefined,
    params.fee, 0,
    params.lastRound, params.lastRound + 50,
    undefined, params.genesishashb64, params.genesisID,
    asset, await algod.getTransactionParams()
);
const sOptInTxn = optInTxn.signTxn(account.sk);
await algod.sendRawTransaction(sOptInTxn);
After opt-in, the next step is to send provider info to the client. This is done by sending 0 of the asset to the client, and putting the provider name (bytes) in the note field.
Tip
This implementation uses only the provider name. A more advanced implementation might provide more information, since the note field can be up to 1kb in size.
const confirmTxn = algosdk.makeAssetTransferTxn(
    account.addr, assetInfo.creator,
    undefined, undefined,
    params.fee, 0,
    params.lastRound, params.lastRound + 50,
    new TextEncoder().encode(PROVIDER_NAME),
    params.genesishashb64, params.genesisID,
    asset, await algod.getTransactionParams()
);
const sConfirmTxn = confirmTxn.signTxn(account.sk);
await algod.sendRawTransaction(sConfirmTxn);
Lastly, we wait for a confirmation transaction from the client, which is a transaction of zero asset from the client to the provider. Notably, we check 150 times (at 4 seconds each, this is roughly 10 minutes) before stopping, because the client does not respond if it rejects the provider.
let lastCheck = -1, count = 0;
const task = setInterval(async () => {
    if (++count === 150) // time out after ~10 minutes
        clearInterval(task);

        const params = await algod.getTransactionParams();
        if (lastCheck === -1)
            lastCheck = params.lastRound - 1;

const txns = await algod.transactionByAddress(account.addr, lastCheck, params.lastRound);
lastCheck = params.lastRound;

if (!txns.transactions)
    return;
for (let i = 0; i < txns.transactions.length; i++) {
    const txn = txns.transactions[i];
    if (txn.type !== 'axfer' || txn.from !== assetInfo.creator || txn.curxfer.rcv !== account.addr || txn.curxfer.amt !== 0)
        continue;

        // approved
        clearInterval(task);
        accounts[name] = asset;
        ws.close(4001, name);
    }
}, 4000);

if (count === 150) ws.close(4002, 'Timeout');
Login
Login from the website frontend is initiated in the same manner as account creation. This can be seen in the repository.
Once a request is received, the provider waits for the client to authenticate themselves by sending 1 of their asset to the provider. Similarly to the last function, there is a timeout here in case the client does not log in.
let lastCheck = -1, count = 0;
const task = setInterval(async () => {
    if (++count === 150)
        clearInterval(task);

    const params = await algod.getTransactionParams();
    if (lastCheck === -1)
        lastCheck = params.lastRound - 1;
    const txns = await algod.transactionByAddress(account.addr, lastCheck, params.lastRound);
    lastCheck = params.lastRound;

    if (!txns.transactions)
        return;
    for (let i = 0; i < txns.transactions.length; i++) {
        const txn = txns.transactions[i];
        if (txn.type !== 'axfer' || txn.from !== assetInfo.creator || txn.curxfer.rcv !== account.addr || txn.curxfer.amt !== 1)
            continue;

        clearInterval(task);
        ws.close(4003, name);

        // return asset here
    }
}, 4000);
if (count === 150)
    ws.close(40004, "Timeout");
Finally, we return the asset to the client.
const returnTxn = algosdk.makeAssetTransferTxn(
    account.addr, assetInfo.creator,
    undefined, undefined,
    params.fee, 1,
    params.lastRound, params.lastRound + 50,
    undefined, params.genesishashb64, params.genesisID, asset
);

const sReturnTxn = returnTxn.signTxn(account.sk);
await algod.sendRawTransaction(sReturnTxn);
Putting It All Together and Final Thoughts
If we put all of these components together, we can see it in action. We then verify that the protocol is working as expected by investigating the asset on GoalSeeker.
This is a basic implementation of a two-factor authentication system as a proof-of-concept, however such a system could be expanded to meet the standards of today’s widely used two-factor authentication systems. I will note some of the many things which could be done to improve a system like this:
1. Ensure that the asset is returned to the client after use. This could be done by freezing the provider’s account when giving authentication (so that the provider cannot transfer it elsewhere) and then using the clawback function to take it back.
2. Ensuring that the accounts do not run out of Algos for fees by notifying the client when the balance is low, or moving the system to MainNet where Algos could be automatically purchased.
3. Expanding the protocol to give more feedback. For example, the client could send a transaction indicating denial (using the note field) when a provider is declined, instead of letting the provider time out.
Hopefully this has provided an insight into what can be done with a decentralized two-factor system that the user can control and even pay for without the need to trust any centralized channel or mechanism whether that is SMS or a single company’s authenticator app.